Going wild with Codeanywhere online IDE containers and virtual servers
![]()
I am using Codeanywhere when I do some kitchensinking when not in the office. While working with it, it really impressed me. It is not perfect, but it a lot what you get for the price of a cup of coffee per month. After starting with a free account to play around for 2 week, I purchased the starter account for as low as 30 USD annually. That contains only 1 container that is running as long as your session lasts in the tab of your browser.
Security issues
I read in some internet articles that there might be an issue with security, so it is wise not to do your greatest secrets online as well as storing sensitive information and certainly no data that involves privacy issues.
A container with own virtual server, get out of here
Yes really, in your starter account you get 1 container where you can attach a virtual server. You can even select which one, I chose an Ubuntu server, but also CentOS and even a dot Net server can be chosen. And if you don't like it, you just destroy it and start with a new one, all in a matter of minutes.
Even MySQL, yes really
The Ubuntu server stack is not a big one, but this article will show some tricks that is done out of the box. But even as small as it is, it is installed with:
- PHP
- MySQL
- Composer
- NPM (node)
Time to fool around and see how far it will take us
What we will do:
- Install the nano editor (in the SSH terminal)
- Install SASS (NPM)
- Create a SASS watcher
- Create a small HTML with autorefresh
- Use Github to save our work in a Kitchensink repository
The result is a simple html page that is automatically refreshed with different colors, nothing fancy, but it will learn us if you can have SASS watcher open, do your changes on the SASS source code and have it refresh automatically.
Read this article before doing a clone of this repository into Codeanywhere. I will explain it in a moment. When you use this repository, you will have the following contents after the download:
- Kitchensink [root of your project]
- index.html
- assets
- js
- autorefresh.js
- css
- styles.css
- scss
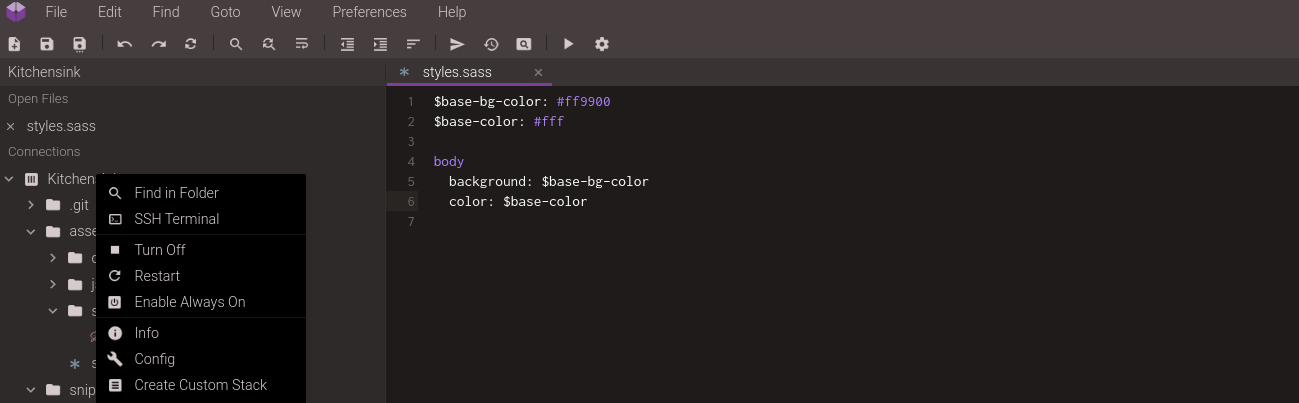
- styles.sass
Steps
Create a new project on Codeanywhere
In the dashboard of Codeanywhere you can create a new project with a container (with the "starter" package you have 1 included) and a Ubuntu or Centos server as virtual appliance.
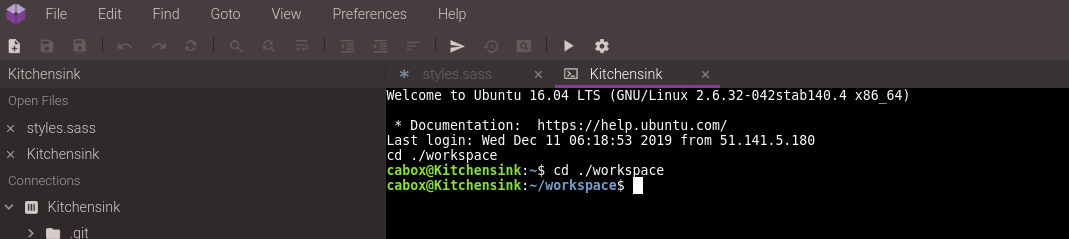
SSH Terminal (within Codeanywhere)
Starting a SSH terminal within Codeanywhere is as easy as selecting with the right mouseclick on the container, the option "SSH Terminal".
This will open an SSH terminal in a new tab within the IDE itself.
Create a new repository on Github (optional)
This step is fully optional, but I have created a Github repository, just to have a commmited version on Github in case I want to start all over again and destroy my container on Codeanywhere.
I assume that you know how to work with Github so I will only show how to install the repository in Codeanywhere.
You enter the SSH terminal and will see by default that the current folder is "workspace". Well do the following steps to restore the Github repository.
Go to the root of the "workspace" folder:
Remove the "workspace" folder
Clone the Github repository into the workspace folder
That completes the restore into the "workspace".
Install nano editor (optional)
I am not a big fan of the VI editor and therefor I install the nano editor.
A sudo password is not required (possibly it will work without "sudo" too)
Install SASS
SASS is used for making CSS compilable with variables.
Create a SASS watcher command
We assume a folder in the root named "assets". In this folder we create 2 folders, one named "css" and "sass" (or "scss", depending on your favorite). In the "assets" folder you create a file named "sass.cmd" with the following content:
#!/bin/sh
sass --watch --source-map scss:css
Change the permission of sass.cmd
Make sure that after saving this file you execute the following statement on the command line:
otherwise you will get permission error when running this command.
Now you can run this SASS compiler by opening an SSH terminal (or use the one you already have open) and open the assets folder. In that folder you enter simply:
Keeping the the terminal session alive
Now the listener starts. But there is a small glitch. Usually the terminal session is terminated after something like 20 minutes of inactivity. You can easily avoid this by entering previous to the sass.cmd the following command:
When running the screen command, you will be in a new screen session, within this session you can create new windows, traverse between windows, lock the screen, and do many more stuff which you can do on a normal terminal.
HTML with autorefresh when running in the virtual server
Now we create the most simple HTML possible, just to see if things will work. Create in the root folder a file named "index.html" with the following content:
<!DOCTYPE html>
<html>
<title>HTML Tutorial</title>
<link href="assets/css/styles.css" type="text/css" rel="stylesheet">

<body>
  <h1>This is a heading</h1>
  <p>This is a paragraph.</p>
</body>

<script src="assets/js/autorefresh.js"></script>
</html>
As you can see this code is applying the contents of the assets/css/styles.css file, but it executes also JavaScript code from the file named "assets/js/autorefresh.js". This file is created in the folder named "js" within the assets folder. So within this folder you create a file named autorefresh.js with following content:
/* auto refresh on blur */
function onBlur() {
  frontEditButton_refreshMe = true;
}

function onFocus() {
  if (frontEditButton_refreshMe) {
    window.location.reload(true);
  }
}

/* check for Internet Explorer */
if ( /*@cc_on!@*/ false) {
  document.onfocusin = onFocus;
  document.onfocusout = onBlur;
} else {
  window.onfocus = onFocus;
  window.onblur = onBlur;
}
This will make sure that everytime you click back to the tab where your webpage is running, it will refresh automatically.
Links

Johan van de Merwe
More from same category

|
|

|
|

|
|
|
|

|
|

|
|

|
|

|