Using (latest) Kint in CodeIgniter
Kint is great debugging tool for PHP to display variables in clear way. It is much more powerful than for example PHP's var_dump command.
Using Kint in CodeIgniter
There was already a Kint solution for CodeIgniter (version < 4), but that has not been updated for 5 years at this moment of writing this article (link to github).
I've stayed a close to the solution as the Kint developers have documented it. This means that I have used Composer as well. But don't get scared now, it is not huge composing that is required. And I did on a Windows 10 laptop, so no magic here.
Steps to get Kint working with CodeIgniter
First of all I have used the CodeIgniter "helpers" functionality and used the third_party folder for Composer contents. I did not change anything else in the rest of the application except for auto loading the helper.
Requirement: Composer
Make sure you have Composer installed so you can execute some composer functions.
It is not the first time that I have used Composer with CodeIgniter, because I have also integrated Mustache in an equal way. That is what gave me the inspiration that it could work with Kint. So let's go and make it work.
Step 1. Composer
Create in the third_party folder of your application a composer.json file with the following content:
{
   "require": {
        "kint-php/kint": "^2.1",
        "kint-php/kint-js": "^1.1"
    }
}
From a terminal or DOS prompt change the directory to the third_party folder of your application.
Now execute the following statement:
composer installNow it will install the dependencies in a new folder named vendor
Step 2. Create a helper to load kint
Now create in the helpers folder of your application a new file named kint_helper.php with the following content:
<?php
require APPPATH . 'third_party/vendor/kint-php/kint/build/kint.php';
require APPPATH . 'third_party/vendor/kint-php/kint-js/init.php';

Kint::$enabled_mode = ENVIRONMENT === 'development';
The first two lines are loading the source code to initialize Kint.
The second line (kint-js) is a plugin that makes it possible to show the content of kint output in the developer console. Instead of using the d($something) you use the j($something), but I haven't worked with this successfully.
The last line enables Kint only when in development mode (see the index.php of your application). You can also put here simply a true or false.
Step 3. Autoload the kint helper
In your autoload.php file in the config folder of your application you can add the helper. You can also load it for every moment you require it like any other helper.
$autoload['helper'] = array('kint', 'url', 'json', 'language');That's it.
Some useful tips on working with Kint
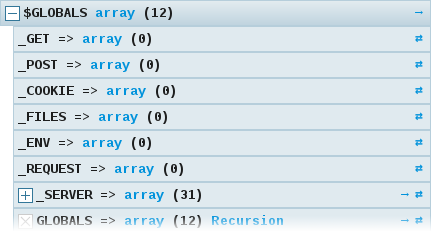
It is important that you read the advanced page of the documentation. The usual statement to get output from Kint is:
d($something, $anotherThing);But if you are using it for an Ajax application where you expect a JSON to return it is really messing up and although it will show the Kint output in the developer console, you can't expand it. That is not the case when you send the output back to the browser.
Plain mode
With the statement:
~d($something);it will show the output in plain text mode, which is in Ajax mode very useful.
Expanded mode
Another option is that you expand the output automatically to make it readable in the developer console (preview tab) by using:
!d($something);but that doesn't show everything, but it works for small amounts of data and small arrays.

Johan van de Merwe
More from same category

|
|

|
|

|
|

|
|

|
|

|
|
|
|

|